The car air conditioner has been used for a long time, and the condenser will have dust, catkins, leaves and small insects attached to it, which will cause poor heat dissipation and increase the engine temperature; the condenser is the external circulation part of the air conditioner and is used to transfer the heat absorbed in the car If the temperature is too high, it will cause the pressure in the system to rise. When the pressure reaches a certain level, the air conditioner will self-protect and shut down, and the compressor will not work; this is what we often call over-pressure protection (also called high-pressure protection) , So it is necessary to clean the condenser.
Therefore, the car air conditioner needs to be cleaned at least once a year; according to professionals, if the car air conditioner is not cleaned for a long time, it will accumulate a lot of dust, which will cause secondary air pollution, which will affect the health of the user after inhalation. Clean it once a month; the cleaning cycle of the filter can be adjusted appropriately according to the frequency of use and the environment.
Car condenser cleaning method1. Mix the detergent with water. The washing product of the condensing net is alkaline, which is slightly corrosive to the condenser, so it is important to add water to reduce the concentration, because too high concentration will only wash cleanly, but the corrosiveness must be considered.
2. Start the car, turn on the air conditioner, and make the electronic fan rotate. First rinse with clean water, and use the rotation of the fan to spread the clean water throughout the condenser. It must be flushed thoroughly. During this period, the electronic fan may stop because the condenser temperature is too low. At this time, stop flushing and let the condenser The temperature rises, causing the electronic fan to run again.
3. After the entire condenser is soaked, use a water spray tool (such as watering flowers, etc.) to spray the mixed washing product onto the surface of the condenser. At this time, the electronic fan should also be running and use it The movement is sucked in and distributed to all corners, and it is estimated that all the sprays are enough. At this time, turn off the air conditioner and engine and observe the surface of the condenser. After a few minutes, you will see that the dirt on the surface will slowly "float" with some small bubbles. Wait a few minutes (we usually wait ten to Fifteen minutes, depending on the concentration).
4. Start the air conditioner again to rotate the fan. At this time, rinse with a lot of water. The more thorough the rinse, the better. Don’t be lazy at this step. When you’re done, you will find that the surface of the condenser is clean. We generally can. Wash the condenser until it looks like new.
Instruction Manual
1. Features
Clock display, 10 sets of adjustable timed power control, randomized power control, manual switch and optional DST setup.
2. First time charging
This timer contains a rechargeable battery. It is normal that the new/old model runs out of battery if it wasn`t being charged for a long period of time. In this case, the screen will not turn on.
To charge : simply plug the timer to a power outlet. The charging time should take at least 15 minutes.
If the screen doesn`t light up or displays garbled characters, simply reboot the system by pressing the [RESET" button.
3. Set clock
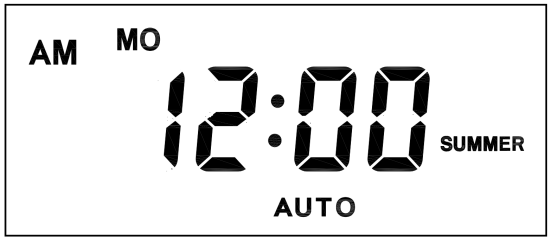
Hold [CLOCK" button and [WEEK" button to adjust week.
Hold [CLOCK" button and [HOUR" button to adjust hour.
Hold [CLOCK" button and [MINUTE" button to adjust minute.
Hold [CLOCK" button and [TIMER" button to select 12 hour/24 hour display.
Hold [CLOCK" button and [ON/AUTO/OFF" button to enable/disable DST (daylight-saving-time).
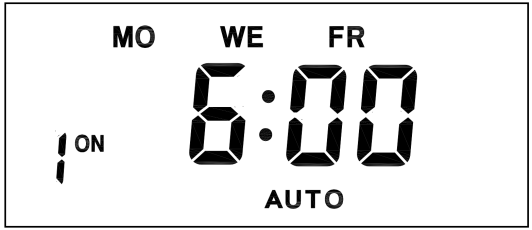
4. Set timer
Press [TIMER" button, select and set timer. Setting rotation : 1on, 1off, 2on, 2off, ...... , 10on, 10off.
Press [HOUR" button to set hour for timer.
Press [MIN" button to set minute for timer.
Press [WEEK" button to set weekday for timer. Multiple weekdays can be selected. ex: if selected [MO", the timer will only apply on every Monday; if selected [ MO, WE, FR", the timer will apply on every Monday, Wednesday and Friday.
Press [RES/RCL" button to cancel the selected on or off timer. The screen will show "-- -- : -- --" , the timer is canceled.
Press [RES/RCL" button again to reactivate the timer.

When timers are set, press [CLOCK" to quit timer setting and return to clock.
5. Random function

Press [RANDOM" button to activate random function, press again to cancel function.
System only runs random function when [AUTO" is on.
Random function will automatically start the timer from 2 to 32 minutes after the setting.
ex : if timer 1on was set to 19:30 with the random function on, the timer will activate randomly between 19:33 to 20:03.
if timer 1off was set to 23:00 with the random function on, the timer will activate randomly between 23:02 to 23:32.
To avoid overlapping, make sure to leave a minimum of 31 minutes gap between different sets of timer.
6. Manual control
Displayed features:
ON : socket turns on.
OFF : socket turns off.
AUTO : socket turns on/off automatically via timer.
Manual ON setting
Press [ON/AUTO/OFF" button to switch from [AUTO" to [ON".
This mode allows socket of the device to power up. Power indicator will light up.
Manual OFF setting
Press [ON/AUTO/OFF" button to switch from [AUTO" to [OFF".
This mode turns socket of the device off. Power indicators will turn off.
7. Electrical parameters
Operating voltage : 230VAC
Battery : NiMh 1.2V
Power consumption : < 0.9W
Response time : 1 minute
Power output : 230VAC/16A/3680W
Q&A
Q: Why won`t my timer turn on?
A: It`s out of battery, you can charge the timer by plugging onto any power outlet. Charge the device for at least 15 minutes. Then press [RESET " button to reset the device.
Q: Can I set seconds of the timer?
A: No, the smallest time unit is minute.
Q: Does my timer keeps old settings without being plugged onto a power outlet?
A: Yes, the timer has an internal battery, it allows the timer to save settings without a power outlet.
Q: Is the battery rechargeable?
A: Yes, the battery is rechargeable. We recommend to charge it for 4 hours so the battery is fully charged.
Q: Does the timer needs internet connection?
A: The timer does not need internet.
Q: Does the screen have back light function?
A: It doesn`t support back light.
Digital Timer Socket, Timing Switch Socket, Electronic Timer Socket, Timer Socket
NINGBO COWELL ELECTRONICS & TECHNOLOGY CO., LTD , https://www.cowellsockets.com